Step 5. Set up the WordPress Environment
In this section, we will connect to the EC2 instance, install Wordpress (and some prerequisites) and configure it.
Note: during step 2, we could also simply have chosen a pre-installed Wordpress image from the AWS Marketplace. That’s a perfect viable option as well, but for the purpose of this workshop, we’re doing it the manual way so that you can understand the different steps involved in setting up a Wordpress instance from scratch.
Now, follow these steps.
- Visit the EC2 console.
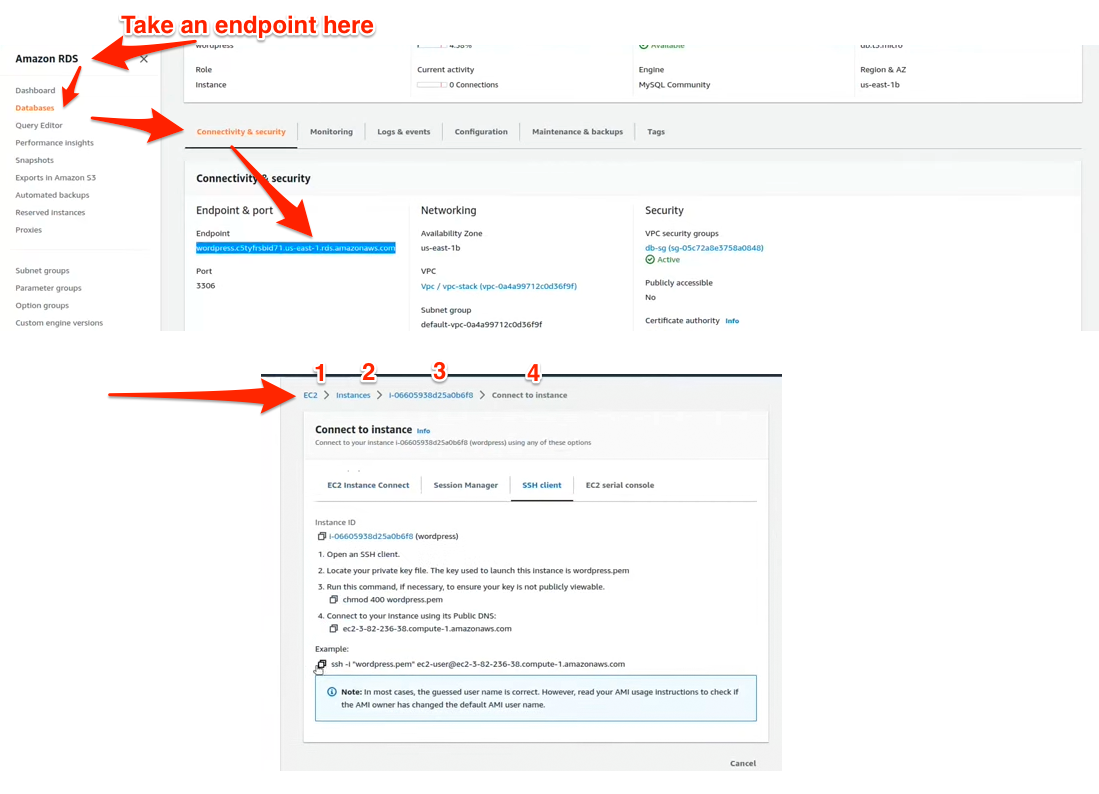
- Select the instance with name wordpress.
- Click the Connect button on top. A dialog will open that provides you with the information required to connect to the EC2 instance via SSH (like the DNS address and user name).
Before the next step, please make sure that you have an SSH client available. Windows users can download and use Putty for that, Linux and MacOS users can simply open a terminal window. If you’re not familiar with using an SSH client, please follow our documentation (Connect using SSH, Connect using Putty).
After you have successfully established the SSH connection, please run the following commands to install Apache (web server) and MySQL on your instance:
sudo yum install -y httpd
sudo yum install -y mysql
Let’s now set the endpoint of the database we’ve created earlier as an environment variable so that the Wordpress instance will know where to connect to. The endpoint can be found in the RDS console, where you need to select the wordpress database, then copy value shown as Endpoint.
The address is then set as environment variable with the command below (be sure to replace with the actual value copied above).
export MYSQL_HOST=<your-endpoint>
Next, we’ll connect to the database using the Username and Master password that we set earlier for the database when creating it. So be sure to replace the placeholders with those.
mysql --user=<your-username> --password=<your-password> wordpress
You should now be connected to the database (a welcome message should be visible). Now let’s create a new database for Wordpress and grant the necessary permissions.
CREATE USER 'wordpress' IDENTIFIED BY 'wordpress-pass';
GRANT ALL PRIVILEGES ON wordpress.* TO wordpress;
FLUSH PRIVILEGES;
Exit
Through the Exit command above, we’re now back on the EC2 instance. Let’s download Wordpress now and unzip it.
wget https://wordpress.org/latest.tar.gz
tar -xzf latest.tar.gz
Move into the WordPress folder and backup the default config file.
cd wordpress
cp wp-config-sample.php wp-config.php
After that, use nano to edit the wp-config.php file:
nano wp-config.php
Scroll down until you can see the define statements below.
// ** MySQL settings - You can get this info from your web host ** //
/** The name of the database for WordPress */

define( 'DB_NAME', 'database_name_here' );

/** MySQL database username */
define( 'DB_USER', 'username_here' );

/** MySQL database password */
define( 'DB_PASSWORD', 'password_here' );

/** MySQL hostname */
define( 'DB_HOST', 'localhost' );
Now replace the first two placeholders values with the following values:
- DB_NAME:
'wordpress' - DB_USER:
'wordpress' - DB_PASSWORD:
'wordpress-pass'
For the database host, please use the endpoint address copied earlier.
- DB_HOST:
'<replace-me>'
Scroll a bit further down until you can see the following section.
/**#@+
 * Authentication Unique Keys and Salts.
 *
 * Change these to different unique phrases!
 * You can generate these using the {@link https://api.wordpress.org/secret-key/1.1/salt/ WordPress.org secret-key service}
 * You can change these at any point in time to invalidate all existing cookies. This will force all users to have to log in again.
 *
 * @since 2.6.0
 */
define( 'AUTH_KEY',         'put your unique phrase here' );
define( 'SECURE_AUTH_KEY',  'put your unique phrase here' );
define( 'LOGGED_IN_KEY',    'put your unique phrase here' );
define( 'NONCE_KEY',        'put your unique phrase here' );
define( 'AUTH_SALT',        'put your unique phrase here' );
define( 'SECURE_AUTH_SALT', 'put your unique phrase here' );
define( 'LOGGED_IN_SALT',   'put your unique phrase here' );
define( 'NONCE_SALT',       'put your unique phrase here' );
Visit this link, which will provide you with unique keys and salt information for cryptographic operations of the Wordpress instance. Replace the block above with the information from the web page (either replace the placeholders on by one, or replace the entire section - tip: Ctrl-k removes a line in nano).
Next, copy the snippet below that configures a required plugin.
/** to allow 'W3TC' plugin write the configuration data into DB */
define( 'W3TC_CONFIG_DATABASE', true );
When done with modifying the Wordpress config file, use CTRL + X to quit nano editor. Be sure to confirm the prompt for saving the file with “Y”.
Now that Wordpress is configured, let’s install a few more dependencies, copy the Wordpress files to the directory of the web server, and ensure that the web server (Apache) has the appropriate permissions for the Wordpress files.
sudo amazon-linux-extras install -y lamp-mariadb10.2-php7.2 php7.2
sudo yum install -y php-xml
cd /home/ec2-user
sudo cp -r wordpress/* /var/www/html/
sudo chown -R apache:apache /var/www/html
Finally, let’s start the web server.
sudo service httpd start
sudo systemctl restart php-fpm